In February 2025, I teamed up with my long-time friend and hiking partner to conquer the O-Trek in Torres del Paine National Park.
We took all of our hiking gear, planned all of our food, we shoved everything we needed into a bag and went off to hike the notorious John Garner pass to overlook Grey Glacier.
What followed was a week of blisters, belly laughs, wild mountain weather, and the trek of a lifetime. This guide blends that first-timer’s perspective with practical info you actually need: exactly how we booked, what the days felt like, how much it cost, gear tips, and all those little things I wish I’d known before trekking Patagonia’s O Circuit.

What Is the O Trek in Patagonia and Why Is It Famous?
The O Trek in Patagonia is an epic 120 km (75 mile) hiking circuit around Torres del Paine National Park in Chile, taking 6 to 9 days to complete. Revered for super cool mountains, glaciers, valleys, and iconic camping spots, the O Trek is known as one of the world’s premier multi-day adventures. It’s a full loop (hence the ‘O’) with challenging trails, fewer crowds in the northern section, and unforgettable wilderness camping or refugios.
This trek appeals to hikers seeking an authentic Patagonian experience with plenty of reward for the challenge.
How to Book and Plan the O Trek in Patagonia
Booking the O Trek in Torres del Paine can feel intimidating your first time,but it’s totally manageable with a plan. Here’s how to lock it in for 2026:
- Decide on self-guided vs. guided: Self-guided is budget-friendlier and flexible if you have backpacking chops, but guided tours handle all logistics, food, permits, and even provide porters. Traveling with a group? Consider a guided option. Going full adventure? Self-book.
- Choose your window: Peak season in Torres del Paine is December to March. This is when all camps and refugios operate, trails are passable, and weather isn’t (completely) out to get you.
- Reserve camps/refugios: All sites require advance booking. Platforms like Booking Patagonia Travel and the official operator or refugio websites open bookings months ahead (and some popular spots sell out within hours). Plan your itinerary before signing up.
- Lock in transport: Buses and shuttles from Puerto Natales to the park should be booked alongside your trek,especially that crucial return transport on your last day.
- Gear up: If you’re not hauling it from home, reserve tent/camping gear or beds at refugios as needed. Rentals get scarce in high season.
- Permits and paperwork: Print all confirmations and park entrance permits. Carry paper copies and cash for incidentals. Double-check shuttle and park bus schedules, especially for that last bus out!
Booking early = more campsite choice and less stress.
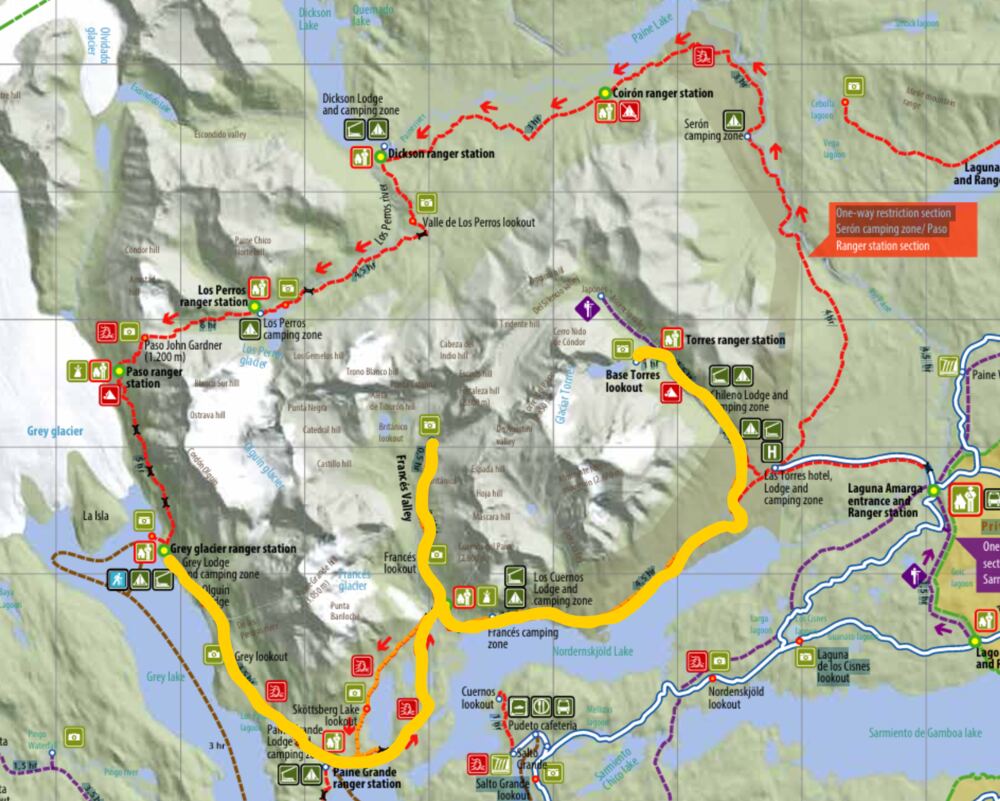
The O Trek Patagonia Map and Navigation
Take my advice: do not show up without a map, digital or paper.
Good news: the O Trek is well-marked, but Patagonia’s wild weather can turn “easy navigation” into “where is the trail marker?!” in a single cloudburst.
- Official trail maps: Download from Torres Del Paine official site, print, and bring along.
- Offline GPS: Maps.me or AllTrails work wonders (just pre-download the region before you lose cell service). There is no cell reception on the trek, and only paid WiFi in refugios.
- Paper backup: Always have a hard copy tucked away in a dry bag. You’ll want this if your device dies or gets soggy.
- Wayfinding tips: Trails are obvious at all intersections and ranger stations. Check in at each checkpoint, they’ll ask you to sign the book for safety.
- Extreme weather: Sudden wind and fog can turn navigation into a challenge. Know the refugio/ranger station order and always note your next destination.
What is the difference between the O-Trek and the W-Trek?
The O-Trek is a full loop around the mountain range within Torres del Paine National Park, totaling about 120 km (75 miles), and encompassing the W-trek within the southern section of the trail. The O-Trek’s longer distance means it has fewer trekkers than the W-Trek.
The W-trek is the more popular hiking trail, totaling about 80 km (50 miles). It’s laid out in the shape of a W, giving it its name, W-Trek. The trail starts at Camp Grey and leads east: first up the Francés Valley to Francés and Británico Lookouts, then to Base Torres Lookout, finishing at Torre Central. It can also be completed in the opposite direction.
O Trek Patagonia Cost Breakdown (2026)
Let’s talk numbers (because this trek is epic, but it ain’t free):
| Expense | Budget (USD, 2026) |
|---|---|
| Park Pass/Entry | $50-70 |
| Campsite Permits (7 nights) | $70-180 |
| Tent/Bedding Rentals | $50-300+ |
| Refugio Beds (if any nights) | $60-120 per night |
| Bus/Transport (R/T, Natales) | $60-100 |
| Food & Snacks (DIY) | $100-200 |
| Gear Rentals (poles/sleep bags, etc) | $50-120 |
| Estimated Total | $1000,$1500 |
If you go for a fully guided, all-inclusive experience, expect $2500+ per person. Campsites at Grey and Central are most expensive and book out fastest. Budget extra cash for shuttles, showers, and indulgences.
My One-Week O Trek Itinerary (2026)
Ready for the daily grind? Here’s the breakdown of seven days hiking the O Circuit, with my (blister-fueled) firsthand notes, plus the camps where we slept each night.
Note: This is my experience hiking on the O-Trek. I talk about everything I wish I knew before the trek, what camps I chose to stay at, and my impressions of each day.
| Day | Route (Start → End) | Distance | Elevation gain/loss | Est. Hiking time |
|---|---|---|---|---|
| 1 | Central → Serón | 13 km | +346 m / -324 m | 4 hours |
| 2 | Serón → Dickson | 18 km | +469 m / -420 m | 6.5 hours |
| 3 | Dickson → Los Perros | 12 km | +509 m / -157 m | 6.25 hours |
| 4 | Los Perros → Grey (via John Garner Pass) | 15 km | +831 m / -1324 m | 10 hours |
| 5 | Grey → Paine Grande | 11 km | +372 m / -400 m | 4 hours |
| 6 | Paine Grande → Los Cuernos (via Francés Valley) | 24 km | +987 m / -945 m | 10.5 hours |
| 7 | Los Cuernos → Base Torres → Central/Park Exit | 26 km | +1343 m / -1287 m | 11.25 hours |
My friend and I booked our self-guided trek in Patagonia through Booking Patagonia Travel. We decided the distances we wanted to hike each day (depending on our budget) and this site gave suggestions for tours, allowed us to book our spots along with all rentals we needed.
We went on the trek at the end of peak season, in February 2025, which was perfect, as the trails had fewer people and clear skies!
If you are looking for other common FAQs about Torres del Paine, or how to book your trip to Patagonia, I have another post that goes over general questions of Torres del Paine National Park and how to prepare for the hike.

Warm-Up Hike: Puerto Natales
Highly recommend a warm-up wander near Puerto Natales (Cerro Benítez near Laguna Sofía was my pick, 8km, quick, and the condor-spotting is off the charts).

A few days before our bus to Torres del Paine, we went to hike Cerro Benítez by Laguna Sofia. This was a short hike about 25 minutes outside of Puerto Natales. The hiking trail was about 8 km and only took about three hours to complete. It was a good warm-up with the little elevation gain, and an amazing place to see condors!
Day One: Central to Serón
Distance: 13 km
Weather: Sunny
Elevation: +346 m (1135 ft) / -324 m (1063 ft)
Total Hiking Time: 4 hours
Consider this your “second warm-up”, a gentle start through grasslands. The Serón campsite is open, flat, and exposed (think: no shelter from either stars or wind). Cooking shelter is… rustic. Get ready to bond with your Jetboil.
It was a short and easy day on a relatively flat trail that lead us through mostly grasslands. There wasn’t much elevation gain, and the trail itself was mostly ATV tracks, which made it easy to walk but a less exciting trekking day.

Starting from the trailhead we walked with the crowds entering the park, but quickly split ways. Most people start the W-Trek or take a one-day hiking trip to the Base Torres, both of which lead in the opposite direction as the O-Trek.
About Serón Campsite
Serón Camp is a big, open, flat field. The luxury tents outline the perimeter of the camp, elevated off the ground, with the remainder of the camp available for pitching tents. There is no difficulty in finding space here, but it is almost impossible to find shade or shelter from the elements.
The cooking facilities are in a tent between the lodge and the bathrooms. This is a relatively small tent, so it can fill up fast. I found this site was the hardest (and coldest) to make our meals considering it was the only site without a solid structure for cooking.
All in all, the campsite at Serón is nice and perfect for watching the stars on a good night, but it’s important to note that the sites get infinitely better as the days go on.
Day Two: Serón to Dickson
Distance: 18 km
Weather: Sunny
Elevation Gain: +469 m (1539 ft) /-420 m (1378 ft)
Total Hiking Time: 6 hours 30 minutes
Scenery turns mountainous. My feet turned… raw. If you are blister-prone, pre-tape everything. Dickson campsite is an absolutely gobsmackingly beautiful mountain valley on a lake, plus actual hot showers.
Hiking from Serón to Dickson was a day to really test my hiking shoes. It was a mostly-flat trail and a relatively easy hike, but this was where we started to see the terrain change from ATV paths to smaller foot trails. With about 18 km to our next destination, this was when I saw the beginning of my downfall.
Day two marked the beginning of my multi-day blister saga, one that left me with an empty medkit and bloody socks. (Raw heels aside, the trek is still 100% worth it.) Take my advice: protect your feet! As the days get tougher, it’s hard to appreciate the stunning surroundings when every step feels like fire.
About halfway through the day’s hike, we reached our first ranger station. This was a perfect spot to refuel with lunch at the picnic tables, fill up on water, and take advantage of a sheltered outhouse.
Here, like at every ranger station ahead, we needed to check in by writing down our name, the time we arrived, and our passport numbers.
This system isn’t just for record-keeping; it’s also for safety. It ensures every traveler stays accounted for and has enough time to reach the next stop before nightfall.
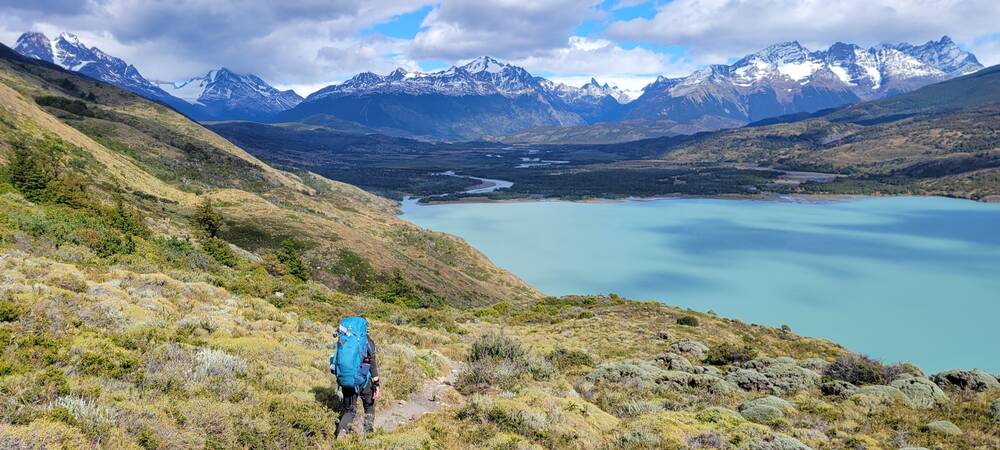
About Dickson Campsite
Dickson camp was easily one of the most beautiful places I have ever slept. This camp is set up in a valley along Dickson Lake and surrounded by mountains. I was really just blown away by the scenery and the serenity of the place. The site was also very quiet, as it is only accessible to those hiking the O-Trek.
The facilities are quite an upgrade compared to the Serón camp. There is a hostel for those who want a comfy bed, and hot showers are available for everyone! There is an indoor cooking area with running water and tables for everyone to share.
Day Three: Dickson to Los Perros
Distance: 12 km
Weather: Sunny
Elevation Gain: +509 m (1670 ft) / -157 m (515 ft)
Total Hiking Time: 6 hours 15 minutes
Short day, more rugged. Los Perros camp is buggy, muddy, with glacier views and cold water, true backcountry vibes but still “glamping” by most standards.
Day three was another short day leading farther into the mountains. This was where we got a taste of our first glacier!
Hiking from Dickson to Los Perros was where things started to feel like a true Patagonian adventure. The day kicked off with a peaceful stroll through the forest, but the trail quickly started throwing some steep, root-covered climbs.
Then came the real showstopper in the form of the Los Perros Glacier.

With only about a kilometer left of our day, we suddenly popped out of the forest and were rewarded with a jaw-dropping view of the glacier feeding into a little lagoon. Many people were stopped here for lunch or a quiet hiking break before continuing on into camp.
We stayed for a while so I could take a bunch of photos, of course. The ice was a huge contrast to the rocks. I needed to!
About Los Perros Campsite
This camp was set up in a dense forest just after the rocky terrain that leads you to Los Perro Glacier. The camp is rugged, often muddy, a bit chilly, and has no hot water, but hey, that’s all part of the adventure, right?
Due to its proximity to the water and the camp’s lush forestry, I was bombarded with bugs. This was the buggiest spot on the whole trek for me.
A little advice: enjoy the peace and quiet of Los Perros, because this is the last day of quiet camps; the next few sites are a part of the W-Trek.
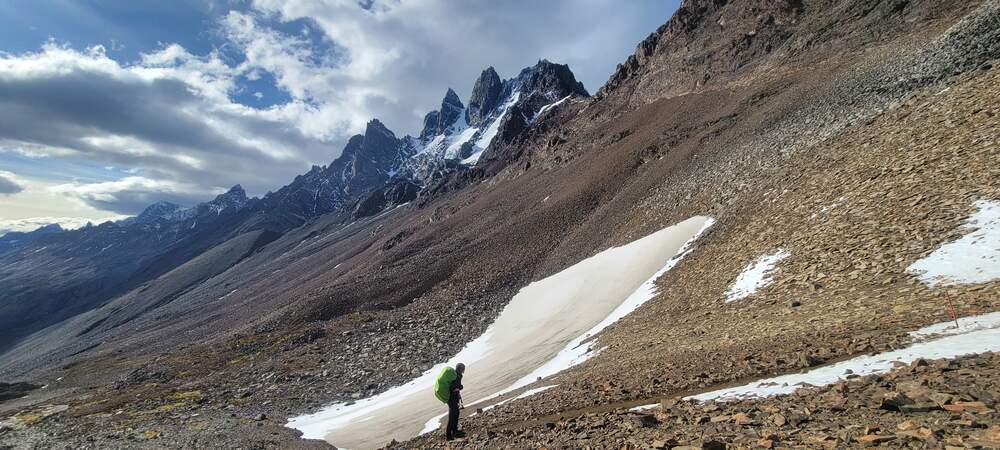
Day Four: Los Perros to Grey (John Garner Pass Day)
Distance: 15 km
Weather: Sunny
Elevation: +831 m (2726 ft) / -1324 m (4344 ft)
Total Hiking Time: 10 hours
The toughest, and, honestly, the most epic. Up at 7am for the pass, which is four hours of rocky uphill and endless false summits, rewarded by that first jaw dropping view of the Grey Glacier. Poles and snacks required. Suspension bridges and massive glacier vistas on the descent.
With an elevation gain of 831 m (2726 ft) and a loss of 1324 m (4344 ft), I found this was the hardest day of the O-Trek. Hiking from Los Perros to Camp Grey consisted of climbing up the John Garner Pass and making our way down a grueling, steep descent, so this day was difficult; however, it was also one of the most beautiful days. In the pass, we had our first view of Grey Glacier from above!
Due to the day’s difficulty, Los Perros has a checkout time of 7 am. This was non-negotiable, and rangers actually time-checked and ushered us along to make sure everyone was up and out of camp on time. It was an early day, but this was to make sure everyone had enough time to get up the pass in the earlier hours and complete the hike in daylight.

Our day started with an uphill climb almost immediately. As we took off, the path changed from dirt and dense forest to loose rocks and open mountain. Climbing above the treeline, we had an amazing view of the sun rising between the two mountains just behind. It was honestly like a postcard.
As we continued, the loose rubble turned into bigger rocks and steeper terrain. Eventually, we were just hopping between rocks on our way up, and my legs were on fire. It was like climbing stairs for four hours straight. Every time I thought we were at the top, there were more rocks and a new marker in the distance.
The leg pain was worth it once we got to the top of the pass, though. Here, we were presented with the first view of Grey Glacier.

Pictures will never do this sight justice. The feelings of pure joy I had when seeing this ancient ice field were so overwhelming. To top it off, there was the pride of scaling up the side of this mountain to revel in, and the mountains behind us to ensure that everywhere we looked was filled with beauty.
After the pass, it was all downhill (literally, not metaphorically). There was about 10 km of steep downhill to navigate (so if you have bad knees, bring some painkillers, poles, and lots of motivation snacks), which brought us almost eye level with the glacier. Along the way, we also passed the second ranger station.
After the ranger station and the worst of the descent, we crossed three big suspension bridges. Each one crosses fissures in the land and swings high above rocky streams leading down to Grey Glacier. These bridges are long, high up, and bouncy, so windy days can be difficult, but they sure are fun!

Once across the bridges, we were met with an overload of people at Grey Campsite who were starting the W-Trek or taking a day to explore the glacier!
About Grey Campsite
This was by far the busiest and fanciest camp on the trek. With a hotel, many hostel rooms, and fancy camping grounds, this place feels like luxury. There is hot water available everywhere and a very big cooking room to relax and enjoy.
Extra excursions at Grey
Many people spend a few extra days at this campsite. Because of its close proximity to the glacier, this is where a lot of day excursions begin. From here, you can go on a kayaking tour to get up close and personal with the glacier and many small icebergs, book a tour to hike onto Grey Glacier itself, or take yourself on one of the day hikes around the area for other views of the glacier!
Day Five: Grey to Paine Grande
Distance: 10km
Weather: Overcast
Elevation: +372 m (1220 ft) / -400 m (1312 ft)
Total Hiking Time: 4 hours
Short, scenic, and a chance to dawdle at Grey Lake’s icebergs or even book a kayaking or glacier trek. Paine Grande has a huge kitchen for communal food and swapping war stories.
Day five was another short day, so many people took the morning to either do a glacier excursion or sleep in and relax before slowly making their way over to Paine Grande.
Grey was the camp where we were forced into a refugio, so we were those people taking our sweet time to get up… We walked to the little beach, then the lookout areas of the glacier to see the icebergs (which I recommend), and for my friend to climb all the rocks. Then we made lunch and were on our way just after noon.

This hike was nice, with some steep rock-scrambling sections that made the trail really interesting. This section also had another amazing, final lookout over Grey Glacier about halfway along, which worked as an excellent spot for lunch.
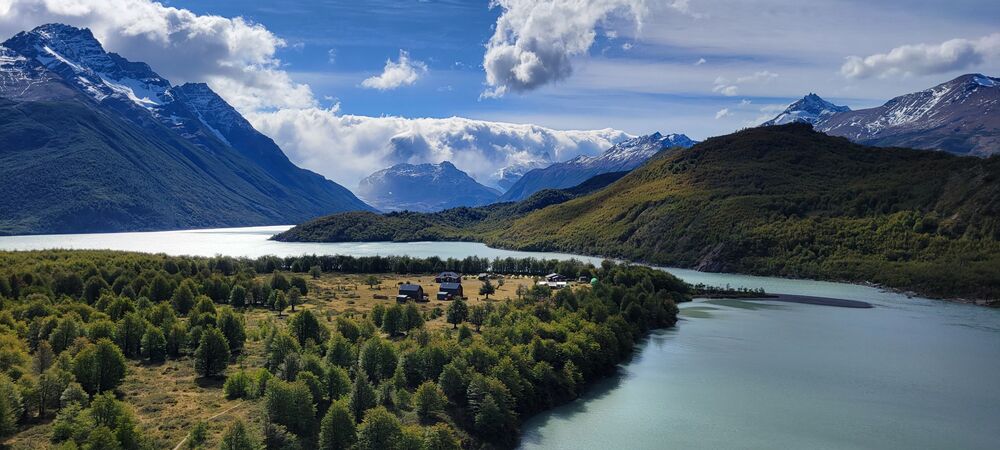
About Paine Grande Campsite
Paine Grande is laid out in a valley along Pehoé Lake, surrounded by beautiful mountains. It also has one of the biggest cooking locations out of all the camps in Torres del Paine, with a separate (yet still connected) spot dedicated to dining and mingling.
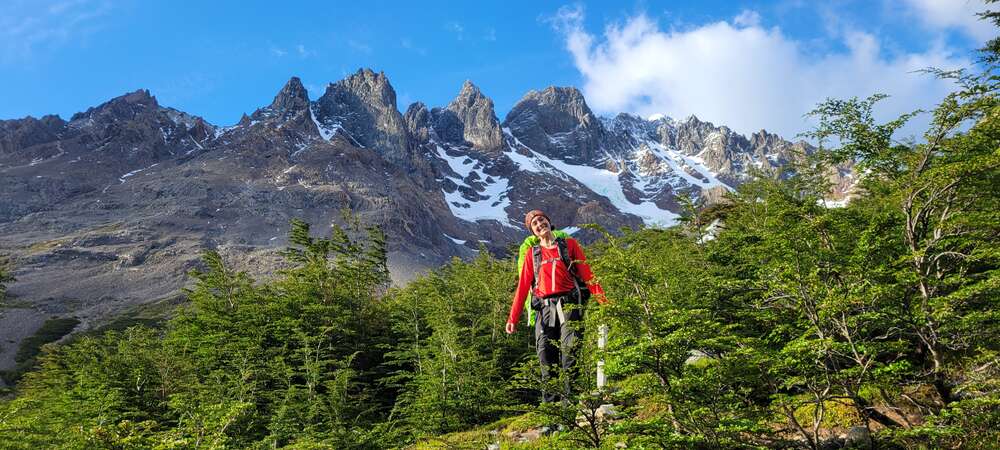
Day Six: Paine Grande to Los Cuernos (via Francés Valley)
Distance: 24 km
Weather: snow, rain, and high winds
Elevation: +987 m (3238 ft( / -945 m (3100 ft)
Total Hiking Time: 10 hours 30 minutes
Long, tough, very “type 2 fun.” Prepare for Patagonian surprise weather: we had howling winds and hail, then mid-morning sun. Británico Lookout at the valley top is worth every wet sock.
This was a tough morning. Our day started at 5 am with relentless rain, hail, and powerful winds. Our morning routine of bandaging my feet, eating breakfast, and packing up was done in the cold and wet. We spent the first hour or so on the trail constantly struggling through wet mud and freezing winds so strong they were blowing us over at times.
Thank goodness for the rapid weather changes in the Patagonian regions, because our miserable start turned into a beautiful, sunny walk by mid-morning.

This was the second hardest day of the O-Trek for me (following day four up John Garner Pass). The distance includes the hike up Francés Valley to Británico Lookout, and although it was difficult, the multiple viewpoints were absolutely stunning.
To make things easier, there is a ranger station at the base of Francés Valley that has a bag drop to leave gear as you climb, and we did exactly that. From there, we just took some water and snacks and enjoyed the day. The light weight was a big welcome after so many days of carrying a heavy weight.
The trail up Francés Valley was a long and rocky uphill. The trail runs through forested areas, so there was lots of shade to cover us as we slogged our way uphill.

At the top, Británico Lookout opened up a 360-degree view of mountains as we stood in a valley between them. The best part was that we could see glaciers and even hear the thunder-like sound when they fell in the distance.
About Los Cuernos Campsite
Los Cuernos is at the base of the Cuernos del Paine (Horns of Paine). The camp sits between Refugio Paine Grande and Refugio Chileno, making it a popular overnight stop for trekkers heading toward Francés Valley or the Base Torres viewpoint.
This camp is quite hilly compared to the other open camps and is located in the trees, providing a lot of shade.
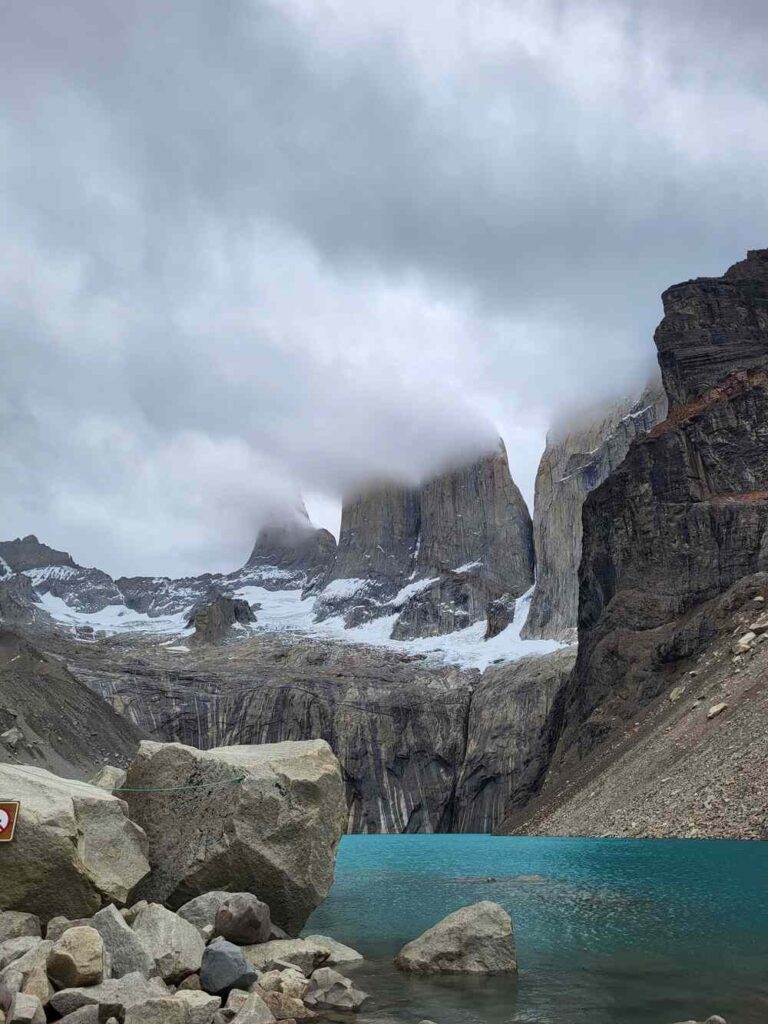
Day Seven: Los Cuernos to Base Torres and Exit
Distance: 26km
Weather: Sunny
Elevation: +1343 m (4406 ft) / -1287 m (4222 ft)
Total Hiking Time: 11 hours 15 minutes
The grand finale. Yes, you’ll notice the crowds near Base Torres, but that view, those jagged towers over blue lagoons, are their own reward. Don’t miss Camp Chileno’s bag drop and coffee stop; you’ll need the energy for the last big climb.
The final morning was very quiet. We had about 10 km to go before we joined the Base Torres trail, but even before that, we started to notice the slow increase in foot traffic.
Hiking up to the towers was by far the busiest day. Considering this is the one trail that merges the multi-day trekkers and the single-day excursionists into one race to see the towers, the trail gets busy.
like the day before, there was another spot about mid-way up the Base Torres trail, Camp Chileano, where we dropped our bags for an easier hike up the mountain. After the 10 km from Los Cuernos, it was a very welcome reward to be rid of my bag.
Camp Chileano also has picnic tables outside, so we took the opportunity for a quick break and a much-needed coffee before the true climb began.
The trail became even more crowded from there, but it was worth it, as we were on our way to our grand finale of the O-Trek: the famous Las Torres Base Lookout! Even with the cloud coverage, the mountains were mesmerizing to look at. The rocks towered over the crystal clear waters of Lago Torres and had a number of circling condors overhead!
Leaving Torres Del Paine National Park
The ride out of Torres del Paine was a smooth one…because we had booked ahead. What we didn’t realize until our day of leaving was that the last shuttle from the trailhead to the park entrance was at 7 pm. So many people were trying to get on this shuttle bus.
We had a bus booked from the park entrance back to Puerto Natales at 8 pm, as did many other people. Fortunately, as this park is a popular destination for both multiday hikes and single-day excursions, there are many buses running this route back and forth to Puerto Natales.
Some are open buses meant for those who haven’t yet bought a way back to town, and some are devoted to pre-booked travelers. This array of buses can get very confusing (it was for me at least), but don’t panic. When in doubt, as a bus driver!.
After the long hike, the rocking of the bus had me asleep so fast. Despite the aches and pains, this hiking trip was absolutely amazing, stuffed with amazing people and billion-dollar views that I will hold with me forever. I hope to do this again one day and have another experience to share with you.
Getting out: Pre-book that shuttle (last is usually 7pm). Chaos reigns at park exits, so keep your ticket and double-check your time!
What Makes the O Trek So Special?
There are a few things about the O-Trek that made it special for me. The whole trek was challenging but rewarding. After the long days, I earned those bragging rights for completing it all!
There are long days, high elevation, and some difficult terrain along the route, but the mountains, water, and good people made it worth the challenge. The iconic views of Grey Glacier and the Base Torres are a few things that cannot be seen anywhere else in the world.
On top of that, the people I met along the trails were always kind and happy to be on a journey similar to mine. I found some nice friends to share my experience with, and I will always be grateful for that.
- Unmatched scenery: Each day is wildly different with glaciers, hanging valleys, turquoise rivers, endless peaks.
- Shared adventure: I made friends over cookstoves, swapped blisters stories, and found instant camaraderie in this route’s small international hiker community.
- Physical and mental challenge: It’s tough, but so ridiculously rewarding (and tastes so much better when the dinner is rehydrated lasagna).
- Backcountry comfort: Oddly luxurious, hot showers, refugios, actual beds (when you splurge), and plenty of wine at camp stores.
Packing List: What You Really Need for the O Trek
Bring less than you think, but don’t skimp on essentials, Patagonia will throw everything at you except maybe actual pumas.
Depending on the level of hiking and what trek you are doing, you may need more gear. Here is a general list of important items to bring while hiking in Patagonia:
- Layers: Base (synthetic or merino), fleece or insulation, waterproof OUTER with windproofing, hat, gloves.
- Footwear: Sturdy, broken-in boots; camp shoes or sandals; backup socks; blister kit a must!
- Backpack: 50-65L is typical; hip strap and rain cover required.
- Hiking poles: Your knees will thank you.
- Navigation: Park paper map (laminated or in ziploc), offline GPS on phone (charged!), compass (bonus points).
- Camping gear: Tent (if not in refugios), sleeping bag and pad, lightweight cook kit.
- Sun protection: Sunglasses, cap, SPF.
- Rain gear: Jacket, pants, pack cover.
- Personal docs: Passport, PDI slip, ALL printed permits.
- Food/snacks: Enough for 7 days, plus motivation reserves (Goldfish crackers = medicine).
Camping vs. Refugios: Where to Sleep
When booking a trek in Torres del Paine, there are some options of sleeping arrangement luxury to choose from, depending on the experience you are going for (and your budget).
Option one: Camping
Camping is the cheapest option to choose from in Torres del Paine. Each refugio has a designated camping area with three tenting options. You can either bring your own, rent a standard tent, or rent a premium tent.
No matter which option you choose, you’ll have full access to indoor toilets and running water. It’s worth noting that no campsite will give you a genuine backcountry experience, so even camping is more like glamping.
Camp permits: $11 per site, Tent Rental: $40 per tent
We booked our permits and rentals through bookingPatagonia, where they clearly lay out the camp availability and prices.
Option two: Refugios
Refugios are the way to hike in comfort. Almost all campsites have a refugio for trekkers (not including Los Perros) that offer warm beds and hot showers. They are often shared dorms with multiple beds, hostel-style.
This also saves you from having to bring camping gear and a tent.
Option three: Somewhere in the middle
I found this was the best option when balancing the hiking experience and enjoying my time. We were reluctantly forced to book one night in a refugio at Camp Grey due to its popularity and limited space; however, it ended up working out well because it turned out to be the best sleep I had on the trip.
After many days of trekking, I didn’t know I needed this kind of rest until I had it. It hurt my wallet but it was well worth it for the extra energy the next day.
How expensive is it to hike the O-Trek
My seven-day trek cost about $1000 CAD. This cost included park passes, site permits, tent rentals, the food we brought with us, and the transportation to and from the park.
We decided to do the trek self-guided, meaning we went alone, booked our own accommodation, etc. This was the cheapest option we found and allowed us the freedom to hike at our own pace. This also meant we had to bring our own gear, such as sleeping bags, sleeping mats, and hiking poles.
If that struggle doesn’t appeal to you, there are many Torres del Paine O- and W-Trek tour companies to choose from that range in price depending on trekking distance and guided assistance.
Self-Guided vs. Guided: Which to Choose?
Hiking self-guided gives you the freedom to go at your own pace, choose your itinerary, and enjoy the trek on your terms. I planned my own trip with a friend, which allowed us to explore as much as we wanted; however, I’d only recommend this option if you have solid backpacking experience. Patagonia’s trails can be long and demanding.
If you choose to plan your own trek, you can book campsites and rental gear directly here. If you prefer, some companies will arrange a self-guided tour for you, handling all bookings so you just have to show up and hike!
A guided tour provides support and structured itineraries. The company you choose often books the sites and gear for you. They will also provide the food and even porters so you can focus on the hike and the scenery rather than the weight and struggles of packing and carrying gear.
- Self-guided: Ultimate flexibility, save money, but requires you to plan, and to carry everything. Best for backpackers with some multi-day hiking experience.
- Guided: Higher cost, zero logistics, all gear/food provided, usually a built-in hiking crew. Perfect if you like help with permits or don’t want to schlep everything.
Reflections, Stories, and Struggles
What stuck with me most? The people. Those evenings trading stories and chocolate at the cook tent, the bond formed while slogging through sleet together.
What surprised me? How quickly the landscape shifts, crazy winds, then sun; vast quiet, then a burst of hikers at the next camp. One minute you’re alone with the mountains, the next, a cookstove camaraderie.
And the agony? My blisters. Did I mention I had to limp in sandals some days? Stretching helps, but don’t underestimate the wear and tear, even on “easy” days. And pack those motivation snacks!
The People
One of the most wonderful things about hiking the O-Trek was the sense of camaraderie among fellow hikers. Since most people were following the same route, I often found I was crossing paths with the same faces on the trail, at rest stops, or within campgrounds.
At the end of the day, we would sit and make dinner together, striking up conversations, sharing experiences, and swapping photos of the day. This was a huge contribution to helping me form new friendships.

I was surprised by how easy it was to connect with people along the way. There’s something about a shared love for hiking and the awe of Patagonia that makes it simple to find common ground. After a long day on the trail, enjoying dinner with newfound friends became one of the highlights of my trek.
We bonded over our days, talked about our favorite views or hiking mishaps, shared tips for stretching, and even laughed over the struggles of sore legs and unpredictable weather. Within just a few days, I had a group of hiking buddies.
The Route
The O-Trek offers an incredible variety of landscapes, making every section of the hike breathtaking. One moment, we were surrounded by towering mountain peaks, and the next, we were walking alongside a river or gazing at a massive glacier. The scenery was constantly changing and filled with new challenges so no part of the trek ever felt dull.

The trails themselves are fantastic. They’re well-maintained, clearly marked, and blend seamlessly into the environment without feeling intrusive. If you’re prepared with good gear, plenty of food, and enough water, the trek is absolutely manageable.
The key is to pace yourself and embrace the experience rather than rush through it. Sure, I faced the occasional sore muscle and tired feet, but every challenge was rewarded Patagonia’s awesomeness. In the end, that made every struggle more than worth it.
The Weather
We were very lucky with the weather. Before the trek, we were warned of major winds at the top of John Garner Pass that could hit up to 160 km an hour! The weather conditions can change on a dime from sun to hail and snow. Although we had some damp and cold weather, we were given mostly very nice conditions for hiking.
The Wildlife
Other than birds, we didn’t actually encounter much wildlife on the trek (but I’m a loud hiker, so I tend to scare things off). I do have a list of some animals that others on the trek saw while hiking, though.
Horses and hares were common sights, and for the lucky ones, there was even a sighting of a puma. (Apparently, there are many pumas, but they largely avoid humans.)

One of my favorite things about backcountry camping is the quietness of nature, and Patagonia offered me the most peaceful moments of my life. Considering the O-circuit is much less traveled compared to the W trek, I found we walked many kilometers wrapped in quiet.
The Struggles
While the O-Trek is undeniably stunning, it’s not without its challenges. If you’re not used to long-distance hiking, the days can feel tough, especially when carrying a heavy backpack over rugged terrain.
As someone who is prone to getting blisters, I had to limp my way through a few days to avoid bleeding too much. If it wasn’t for the support of my friends, my medkit, my motivation snacks, and my sandals, I would have seriously suffered. (I mean I did, but I would have suffered way more.)

The body soreness really caught up to me after day three. Although some of the days were relatively easy, it’s important to remember to stretch each day. Although I did my best, I was not as limber as I should have been.
The weather can also be unpredictable; one moment, we were basking in the sun and the next, we were battling fierce winds or an unexpected downpour. One day, it even snowed and hailed along with the crazy winds and heavy rain.
Maintaining a positive attitude while in pain, cold, hungry, and blistered was difficult. My motivation snacks really pulled me through some stretches of pure torture (mentally and physically). There were numerous times that my gold fish and chocolate raisins saved me from a mental breakdown.
Key Takeaways
- O Trek: 120 km loop, 6-9 days
- Terrain: glaciers, forests, valleys, mountains
- Cost: $1000,$1500 USD, higher with guides
- Book camps and refugios far ahead
- Best season: December to March
- Bring printed map and offline GPS
- Pack for all weather conditions
- Self-guided offers flexibility and savings
Extra O-Trek Details
- Region: Southern Patagonia
- Location: Torres del Paine National Park, Chile
- Distance: 119 km (73.9 miles)
- Total Elevation Gain: 4857 m (15, 935 ft)
- Difficulty: Challenging
- Days to Complete: 6–9 days (depending on your campsites and distance per day)
- Best Time to Hike the O-Circuit: December–March
- Typical Weather: Unpredictable — high winds, rain, snow, and blue skies can all be expected (within one day)
- Hiker Traffic: Moderate (north half/O-Trek)–Heavy (south half/W-Trek)
- Cell Service: No
- Wifi: Available for purchase in all refugios.
Final Thoughts
In short: The O Trek is tough, beautiful, friendly, unpredictable, and unforgettable. If you’re craving a real adventure, one you’ll talk about for years, with mountain views burned into memory and new friends along the way, Patagonia is calling. And if you see someone hobbling out in wet socks, give them your last Goldfish cracker. They might just write about you next.
Frequently Asked Questions
What is the Torres del Paine O-Trek?
The O-Trek (AKA the O-Circuit) is a dream trip for hiking fanatics like myself. It is a popular 6-9 day, 120 km (75 mile) loop in Chilean Patagonia, around the national park of Torres del Paine. The trek takes you through a variety of park terrains ranging from grasslands, to forests, to rocky mountain passes and glacier lookouts. It’s a beautiful circuit that is challenging and filled with camaraderie, peace, and camping. Official maps are available via the National Park website.
What is the difference between the O-Trek and the W-Trek?
The O-Trek is a full loop around the mountain range within Torres del Paine National Park, totaling about 120 km (75 miles), and encompassing the W-trek within the southern section of the trail. The O-Trek’s longer distance means it has fewer trekkers than the W-Trek. The W-trek is the more popular hiking trail, totaling about 80 km (50 miles). It’s laid out in the shape of a W, giving it its name, W-Trek. The trail starts at Camp Grey and leads east: first up the Francés Valley to Francés and Británico Lookouts, then to Base Torres Lookout, finishing at Torre Central. It can also be completed in the opposite direction.
How much does it cost to hike the O Trek Patagonia in 2026?
The cost for a self-guided week on the O Trek in 2026 ranges from $1000-$1500 USD, covering park passes, campsite or refugio fees, tent or bed rentals, food, gear, and return transport from Puerto Natales. Guided trips or all-refugio stays increase the price.
Where can I find an O Trek Patagonia map?
Official O Trek maps are available on the Torres del Paine National Park website. For GPS navigation, download Maps.me or AllTrails and preload the route before starting, you won’t have cell service on the trek.
Is the O Trek better done guided or self-guided?
Both options are popular. Self-guided treks offer more flexibility and are budget-friendly if you have some backpacking experience, while guided treks handle all logistics, bookings, food, and gear, ideal for trekking newcomers or if you prefer a supported experience.
How do I book campsites and refugios on the O Trek?
All campsites and refugios must be booked in advance, usually through Booking Patagonia Travel, the official operator websites, or partner platforms. Reservations open months ahead and fill quickly in peak season. Print or save every permit before setting out.
What should I pack for the O Trek Patagonia?
Layered clothing (including rain and wind gear), sturdy hiking boots, tent or sleeping bag (if camping), hiking poles, sun protection, maps (printed and offline digital), travel documents, and extra snacks are essential for the O Trek.
What is the best time of year to hike the O Trek Patagonia?
The best time to hike the O Trek is during the southern summer (December to March), when the weather is milder and most campgrounds/refugios are open. Shoulder months (November, April) are riskier due to unpredictable conditions.
Extra Questions
If you are interested in more details or have more questions in regards to Torres del Paine, how to book your hike, and what to expect, take a look at my other post, Hiking Torres del Paine: 21 FAQs for First-Time Hikers 2025.